Use create-react-app to start a new React.js front-end project.
Install dependencies: Tailwind.
Start building out the initial App.js with the proper hooks and event handler. A single page app (SPA), very simple, so we’re not venturing outside this one file for our single quiz component.
In our Flask LTI project, let’s create a separate module for our questions in JSON format. Alongside the app.py, create a questions.py file and add as many questions as you want, in this format which is essentially a python list of dictionaries:
In the Flask app.py, add your new API routes/endpoints after the LTI-related routes. We’re not currently using anything special, such as Flask-RESTful — but as our app grows, it might be advisable to use a nice REST extension and break the API out into it’s own module. Here’s our simple CRUD configuration for now.
The HTTP GET on /api/questions will get us what we need in our current quiz frontend. The other endpoints are available for use as your app grows. They are here to cover all the bases and scale the project on the back-end getting ahead of necessary features — one idea would be a new component that allows instructors to add new questions!
One last file that we’ll need to create alongside our app.py is a dbmethods.py. module. Place your methods (called by our API handlers) for performing database queries in this file:
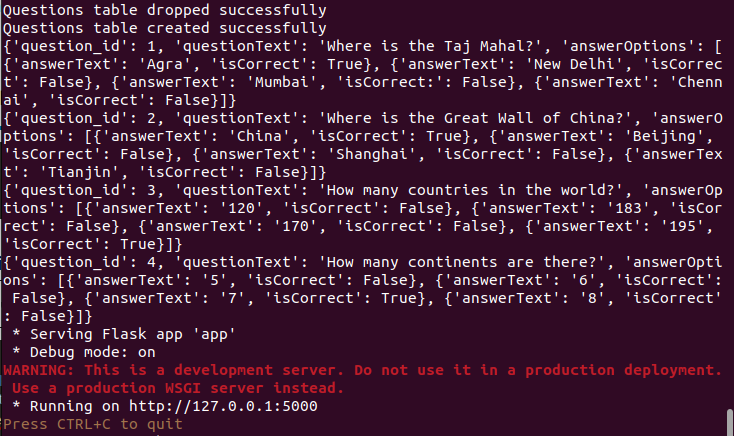
These methods are essentially aligned with our API endpoints when they are called. They are operating on a local sqlite database which will get created once a connection is made. In our Flask app – whenever we launch the new server, we will drop the questions table, recreate it, and load questions from the questions.py module.
SOOO, keep in mind — if you used a tool to create new questions; 1) DB Browser for SQLite OR 2) the Python REPL to connect to the database, running manual queries OR 3) Postman (or curl from the command line) to add new test questions calling the /api/questions/add endpoint that we just created — make sure that you’ve removed or commented out the logic that drops the table to load up our default questions or you’ll lose your work!
There are other approaches that could be taken here, such as using an ORM like SQLAlchemy for Flask. Again, since this is a basic, simple project, we’re just relying on the one questions table for now. I also chose to do a couple of funky things… In order to store an array, I’m finding that I can easily apply repr() when storing — and eval() when retrieving, in order to store and query the exact string and retain the complete syntax of the array. It just seems to make things easier when working with Javascript notation in the end.
Next steps, import the 2 new modules.
In step 1, there were 2 lines commented out at the top of the app.py file that can now be added. The result should look like this, with all our other imports:
from questions import questions
from dbmethods import drop_db_table, create_db_table, get_questions, get_question_by_id, insert_quiz_question, update_question, delete_question
After our API routes, place a few lines that will drop and create the database table (we’re assuming “questions” for all of these). Again for scalability, add the acceptance of arguments (for any table name perhaps) if you want to make the database methods more general:
###############################################################
# End API routes
###############################################################

drop_db_table()
create_db_table()

for i in questions:
    print(insert_quiz_question(i))
After dropping and recreating a fresh table (while we’re developing), the code loops through the imported questions array and inserts them. I’m having all this print to the console for now.
Make sure you are in your Flask project folder and you have activated your virtual environment. Run the Flask server, which should start up and make itself available on localhost and TCP port 5000:
python app.py
My console looks like this:
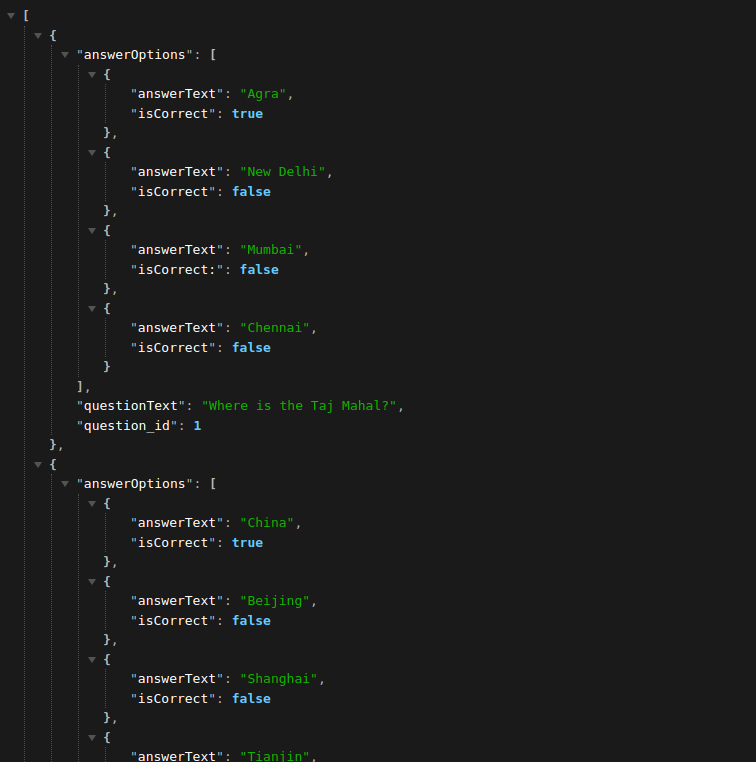
Run a quick test to ensure the questions JSON is being served up from the backend:
http://localhost:5000/api/questions
Here’s just a portion of what we should be seeing:
Update frontend (react.js component) to use the Flask API
Our last piece before testing the full stack tool with a provider is to make sure we have removed the hard-coded quiz questions from our App.js. We want our React app to load the questions into memory from the get_questions API endpoint. The code below shows the hard-coded JSON commented out and replaced with a new version of the useEffect() hook:
Attempting to run the React development build will fail because of the relative path looking to load questions from the backend API. You’ll need to build the frontend again (like the end of Part 4) and place the resulting build files in the static/js and static/css directories in the Flask project. At that point we should be all set to test. Shoot me a comment on the related post if you run into any issues or have questions.
In the next part, we’ll test things out. Feel free to reference the following for getting that started on your own:
I hope to also address some or all of the following in future posts (this is mostly a reminder for me):
Leverage the LTI Advantage Deeplinking Message spec to give folks with certain roles (teacher, instructor, TA) the ability to create new quiz questions.
Implement the use of libraries and extensions that equate to a better, more scaleable app:
Maybe Axios HTTP in the React.js project, placing the use of the fetch API with some other method.
Consider Flask-RESTful
Consider GraphQL and noSQL
Consider an ORM that more easily supports databases (Postgres, MySQL) that aren’t SQLite.
Convert to a new tutorial using Django, DRF, and Vue.js as front-end.
Address the unrealistic scoring logic currently in the LTI-related route.
A Troubleshooting post that addresses:
Launching the app as an instructor or admin and why the app fails to post unless you’re a student.
Potential CORS-related pitfalls??
Easier environment for development and automation / tooling.
Adding questions with Postman
Add toast notifications on correct/incorrect answers
In the next part, we will be building out the front-end. The super-simple quiz that we’ll build in React takes a JSON-formatted set of questions and a list of answers. Each answer will have an ‘isCorrect’ boolean property that will help us determine how to process the final score. The layout will resemble the following, with ‘questionText’ and an array of 4 ‘answerOptions’ objects with ‘answerText’ and ‘isCorrect’ properties.
   [
      {
        questionText: "Where is the Taj Mahal?",
        answerOptions: [
          { answerText: "Agra", isCorrect: true },
          { answerText: "New Delhi", isCorrect: false },
          { answerText: "Mumbai", isCorrect:: false },
          { answerText: "Chennai", isCorrect: false },
        ],
      },
      {
        questionText: "Where is the Great Wall of China?",
        answerOptions: [
          { answerText: "China", isCorrect: true },
          { answerText: "Beijing", isCorrect: false },
          { answerText: "Shanghai", isCorrect: false },
          { answerText: "Tianjin", isCorrect: false },
        ],
      },
    ]
The goal is to load up the data into a database, converting row objects into dictionary format, and serving up the entire payload through an API using our Flask server. Since we’re not quite there yet, and we want to focus on just the front-end at the moment, we’ll simply load this JSON into a React useEffect() hook for testing purposes.
Project Directory Structure
Feel free to change or add directories into a structure that’s more beneficial for your project, keeping everything more organized than what I have, and perhaps defining both a backend and frontend directory structure. The current layout looks like the following for our backend project — so far:
I personally chose to start the frontend in a completely new project, where I then build the static files from the react.js end of things and copy over the final static files into a frontend directory, sitting at the root of the backend project. Like this:
This is not scalable in the long term for large projects, unless you choose to automate the deployment of the static builds from your react application in some way or leverage updates to webpack. Since tooling for production builds is out of the scope of Part 3, we’ll start a second (create-react-app) project and perform a manual copy of built files to the Flask server for the final demonstration and testing.
Alright, let’s continue!
Wherever you choose to start your frontend piece (either in the current project root directory or separate project altogether), run the following at the terminal and keep in mind that this will create a new directory for the project.
After creating the app, follow the directions that are given to change to the new directory and test that everything is working:
cd frontend
npm start
Stop the development server (Ctrl-C ). Open your editor in the frontend directory and remove everything from the src subdirectory. We’re going to create a few new files as we go along.
Tailwind – Note: Tailwind is a rapidly changing project. Make sure you reference the current install docs if you run into any issues with the steps below.
Back to the terminal and the frontend directory, let’s install the Tailwind library:
npm install -D tailwindcss
npx tailwindcss init
Add the highlighted line below to the new tailwind.config.js file, created in the last step:
Create another file (index.js) in the frontend/src directory and add the following code. This is straightforward, common code for launching a new react App component in a virtual DOM:
import React from "react";
import ReactDOM from "react-dom/client";
import "./index.css";
import App from "./App";

ReactDOM.createRoot(document.getElementById("root")).render(
  <React.StrictMode>
    <App />
  </React.StrictMode>
);
Now, let’s start work on the App.js component, which will contain the core code of our new quiz app. Create a third file in the frontend/src directory and name it App.js (following the proper naming convention of capitalizing the first letter of the new component file). Place the following code at the top:
Lines 1-7: Initializing the App and adding our pieces of state:
Questions (eventually loaded from our source API) will be managed by questions and currentQuestion.
showScore and score will be used for managing the points accumulated from correct answers and displaying the result at the end of the quiz.
Lines 9-30: In this initial testing phase, we’ll load the quiz questions and answers through the use of a useEffect() hook. In a later phase, this will contain a method for fetching the data through the backend API.
Line 32: The declaration of another useEffect() hook. The intention of this one will be to POST the final grade to the platform once the state of showScore is true. This will happen after the final question has been answered.
Line 33: Since our useEffect may fire multiple times based on the last line and the array of dependencies containing ‘[showScore, score]’, we don’t want to do anything until showScore’s state is true.
Line 34: The unique launch ID (more on this later) that’s contained in the Flask template (window) is retrieved for inclusion in the POST to the platform.
Lines 35-39: The Fetch API is used here to post the final score through our flask implementation, taking a JSON response and any error output. This could be implemented in a number of ways, including using the Axios library for making promise-based requests. This final code assumes that we are using ‘npm run build’ instead of running in dev mode, so the path to /api/score doesn’t include the full path to our local flask dev server. In other words, this assumes that we are including the static product (.js/.css files) in the backend. More clarification on this later.
Our quiz app will invoke a separate button for each answer. Here’s an event handler that fires once a button is clicked:
Lines 42-45: The handler receives the current correct answer property and adds to the score for a correct answer. Lines 46-50: Set the next question and check if we have are finished with all the questions. If so, we will set the state for rendering the final score.
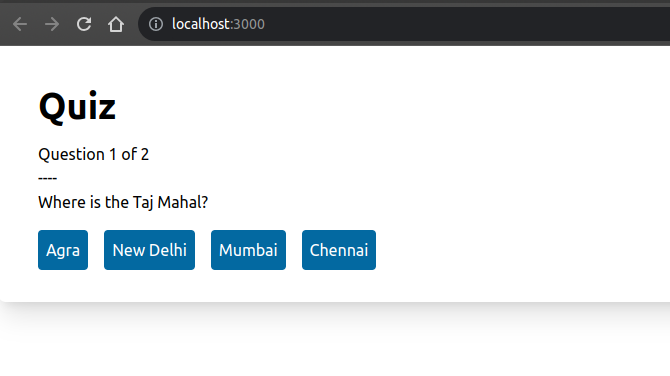
Our simple quiz app uses a conditional (ternary) operators to render the questions and final score. We’re using Tailwind CSS for styling.
Once all the code comes together, run the app to ensure that all is working. The score submission will throw an error until the backend pieces are completed in the next section.
npm run
Connect to http://127.0.0.1:3000 to give the quiz frontend a test
Stay tuned for several new parts in this series, where we’ll complete the following:
Implement the backend APIs and routes
Set up a database (SQLite) for storing and retrieving quiz questions through a set of database methods for running queries.
Complete the Flask template for final rendering of our react component.
Test using the saltire platform emulator.
Create a diagram of all of the moving parts (LTI (Platform <-> Tool), Flask (LTI, API <-> Database), frontend.