Let’s begin again! Welcome to the real part 1 of this series.
Part 1 – Initial Setup of the Flask Backend
Goals:
- Build a Python Flask-based backend for a simple quiz application using the pyLTI1p3 library that supports LTI 1.3 / LTI Advantage. Score passback is included in the launch.
- Build a simple react.js front-end that reads quiz questions from APIs provided by Flask. The front-end will load all questions up-front in our example.
- The Flask backend of the final quiz tool will handle the following tasks:
- LTI conversations with the platform (LMS), leveraging a set of decorators and functions.
- Store and retrieve newly added quiz questions in a sqlite 3 database.
- Provide a set of APIs for adding and retrieving quiz questions and answers.
- The react.js front-end expects React 18 and in this initial exercise, we will be building react into static files in our development environment. While this is not generally the most efficient or best approach, we are building a small application where this is acceptable. For larger projects, alternate approaches using Webpack or a separate development nginx server would be useful.
- I have also added Tailwind to this project, even though some vanilla CSS would probably do the trick. Why not!
Assumptions:
- You have a working knowledge of Python 3 and React.js 18.
- While I will do my best to walk through every line of code, even I do not have a full understanding of the libraries in use. Where I don’t have a ton of information, I will do my best provide links to sites with the most up-to-date stuff.
- You are working on a Linux / MacOS – based system. Most of the commands are transferable if you are using GitBash on Windows… or a Linux subsystem.
- Much of this code was inspired by Dmitry Viskov’s Flask Example repository. The code implements a fun breakout game written in plain JS that pushes a score and time back to the LMS. It also supports some deep linking for setting a difficulty. I may introduce deep linking at a later time (possibly for giving a teacher the ability to create new quiz questions) but that particular LTI service is not part of this tutorial.
Alright, let’s get started!
Make sure you are in an empty project folder, name of your choosing. Here are the commands you’ll want to use for getting your environment set up:
python3 -m venv quizenv
source quizenv/bin/activate
Add the dependencies to your project. Create a requirements.txt file in your project directory and add the following text. We won’t be using all of these in the first couple of parts but will eventually need them:
antiorm==1.2.1
blinker==1.7.0
cachelib==0.9.0
certifi==2023.7.22
cffi==1.16.0
charset-normalizer==3.3.2
click==8.1.7
cryptography==41.0.5
db==0.1.1
db-sqlite3==0.0.1
Deprecated==1.2.14
Flask==3.0.0
Flask-Caching==2.1.0
Flask-Cors==4.0.0
idna==3.4
itsdangerous==2.1.2
Jinja2==3.1.2
jwcrypto==1.5.0
MarkupSafe==2.1.3
pycparser==2.21
PyJWT==2.8.0
PyLTI1p3==2.0.0
requests==2.31.0
typing_extensions==4.8.0
urllib3==2.0.7
Werkzeug==3.0.1
wrapt==1.16.0
In the same directory, load up the required dependencies
pip install -r requirements.txtIn your project directory, create an app.py by using the ‘touch’ command or creating the file directly in your code editor. My preferred is VSCode. Place the following code at the top of the new app.py file:
import os, pprint, datetime
from tempfile import mkdtemp

# from questions import questions
# from dbmethods import drop_db_table, create_db_table, get_questions, get_question_by_id, insert_quiz_question, update_question, delete_question

from flask import Flask, request, jsonify, render_template, url_for
from flask_cors import CORS
from flask_caching import Cache

from werkzeug.exceptions import Forbidden
from werkzeug.utils import redirect
from pylti1p3.contrib.flask import FlaskOIDCLogin, FlaskMessageLaunch, FlaskRequest, FlaskCacheDataStorage
from pylti1p3.deep_link_resource import DeepLinkResource
from pylti1p3.grade import Grade
from pylti1p3.lineitem import LineItem
from pylti1p3.tool_config import ToolConfJsonFile
from pylti1p3.registration import Registration

class ReverseProxied:
    def __init__(self, app):
        self.app = app

    def __call__(self, environ, start_response):
        scheme = environ.get('HTTP_X_FORWARDED_PROTO')
        if scheme:
            environ['wsgi.url_scheme'] = scheme
        return self.app(environ, start_response)

app = Flask(__name__,
            static_url_path='',
            static_folder='./frontend/static',
            template_folder='./frontend/templates')

CORS(app, resources={r"/*": {"origins": "*"}})

app.wsgi_app = ReverseProxied(app.wsgi_app)

config = {
    "DEBUG": True,
    "ENV": "development",
    "CACHE_TYPE": "simple",
    "CACHE_DEFAULT_TIMEOUT": 600,
    "SECRET_KEY": "3dj90jdwi0d320edj9d",
    "SESSION_TYPE": "filesystem",
    "SESSION_FILE_DIR": mkdtemp(),
    "SESSION_COOKIE_NAME": "pylti1p3-flask-app-sessionid",
    "SESSION_COOKIE_HTTPONLY": True,
    "SESSION_COOKIE_SECURE": False,   # should be True in case of HTTPS usage (production)
    "SESSION_COOKIE_SAMESITE": None,  # should be 'None' in case of HTTPS usage (production)
    "DEBUG_TB_INTERCEPT_REDIRECTS": False
}
app.config.from_mapping(config)
cache = Cache(app)- Line 1 – importing some common Python modules. pprint is mostly used for debug.
- Line 2 – tempfile is used for a temporary storage location. Specifically, a call to mkdtemp will be used to define a session file location. More info.
- Lines 4-5 – commenting these out for now. We’ll build these custom dependencies / modules out later.
- Line 7 – Import common Flask libraries for working with APIs and rendering pages.
- Line 8 – CORS support for working with external domains / separate ports. This may not be necessary for our current approach, since we’re only running a single server in development, with React builds… but I like to make sure all bases are covered for all scenarios.
- Line 9 – import the caching libraries needed for our backend. This will get configured later when our app is initialized.
- Lines 11-12 – WSGI utilities for handling exceptions and redirects.
- Lines 13-18 – PyLTI1p3 imports. More information can be found here: https://pypi.org/project/PyLTI1p3/
- Lines 20-28 – A class that’s designed as a safeguard against URL munging when a web client is serving up static files (JS / CSS), when Flask generates HTML content.
- Lines 30-33 – Create an instance of the imported Flask class.
- Line 35 – CORS is used here for specifying origins that are allowed to access our future API endpoints.
- Line 37 – Applying our reverse proxy from Line 20 to our wsgi application.
- Ines 39 – 54 – Configure Flask for session and cache handling. You’ll need to generate your own “SECRET_KEY”. I just mashed some keys on this one. In production, this is used to keep client/server sessions secure. Feel free to paste in the output from something like this — run it in the REPL:
>>> import os
>>> os.urandom(24)
Now, let’s define some Python functions in app.py, used to further configure our LTI application:
def get_lti_config_path():
    return os.path.join(app.root_path, 'configs', 'reactquiz.json')

def get_launch_data_storage():
    return FlaskCacheDataStorage(cache)

def get_jwk_from_public_key(key_name):
    key_path = os.path.join(app.root_path, '..', 'configs', key_name)
    f = open(key_path, 'r')
    key_content = f.read()
    jwk = Registration.get_jwk(key_content)
    f.close()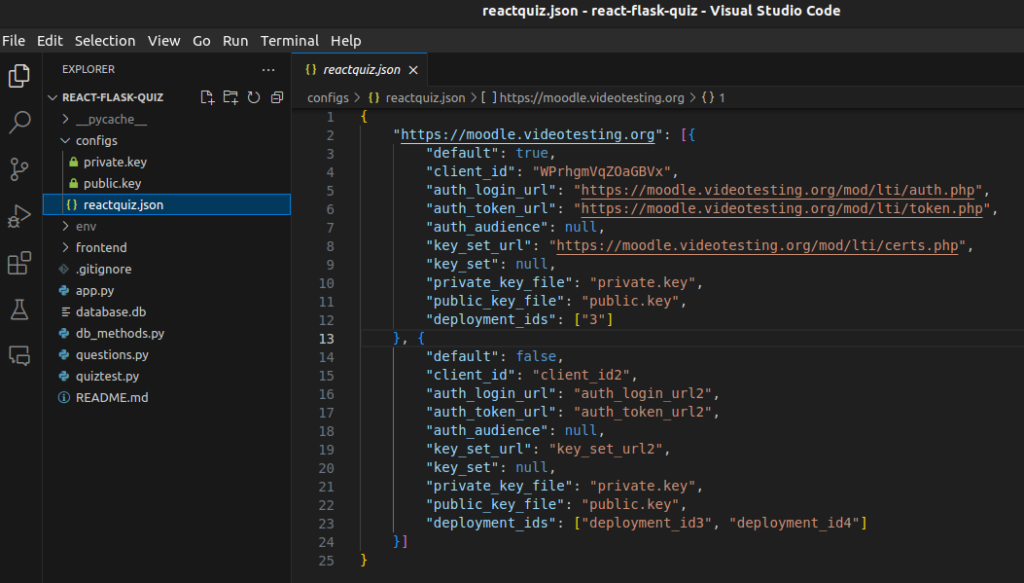
return jwk- lines 56-57 – set the path to the config file, similar to the one below. The purpose of the config file is to specify various platform deployments. I’ve covered this extensively in some other posts:
LTI Moodle Integration using PyLTI 1.3
Adhoc Platforms for LTI Tool Integrations Testing
- lines 59-60: A method for accessing the Flask cache.
- lines 62-68: A method that can be used for serving up the public jwks key for our tool.
At the bottom of your app.py, add the following lines of code (with some additional debug comments in case they are needed for future troubleshooting):
if __name__ == "__main__":
    #app.debug = True
    #app.run(debug=True)
    app.run()
As far as the rest of the initial configuration – make sure other config files that are necessary (at least a public and private key) are available in the <application root>/configs directory (see my screenshot above). More information on these files can be found in my other posts and in the pyLTI1p3 documentation:
LTI Moodle Integration using PyLTI 1.3
Adhoc Platforms for LTI Tool Integrations Testing
pyLTI1p3 – LTI 1.3 Advantage Tool
In part 2, we will finish up the app.py by adding some LTI-related routes that will eventually be fetched by our React Quiz front-end.