Use create-react-app to start a new React.js front-end project.
Install dependencies: Tailwind.
Start building out the initial App.js with the proper hooks and event handler. A single page app (SPA), very simple, so we’re not venturing outside this one file for our single quiz component.
The above function contains some elements that we will see repeat in the following – such as the tool conf, FlaskRequest, and launch data storage. The login route is used to invoke an LTI 1.3 launch where you first receive a login initialization request and return to the platform. The request is handled by first creating a new OIDCLogin object. An exception is raised if an OIDC registration or redirect url doesn’t exist.
Line 76 – ToolConfJsonFile() – receives location of the json config file defined in Step 1.
Line 77 – get_launch_data_storage() – retrieves Flask Cache storage.
Line 78 – Set up the session through a Flask request.
The launch route above is similar in set up as the login() function and performs an LTI message launch, following successful authorization.
The tpl_kwargs dictionary includes arguments that will be sent to the browser when rendering the Flask template page. Some of these aren’t necessarily used for this tutorial and will be ignored when launching the react quiz app. The unused keys in this project include deep link verification and passing in the current user name.
The above will POST the final grade to the platform (LMS) through the LTI Assignment and Grade Service (AGS). We’ll accomplish the following, assuming the user has the proper role and the assignment has been set up in the platform to accept the grade update:
A check is performed for AGS availability and will send any errors back to the server log.
The score passed to the API endpoint is pushed to the grade center (or gradebook) after setting up the column with the proper configuration and timestamp.
This final route is set up for exposing the public key for our tool:
Let’s begin again! Welcome to the real part 1 of this series.
Part 1 – Initial Setup of the Flask Backend
Goals:
Build a Python Flask-based backend for a simple quiz application using the pyLTI1p3 library that supports LTI 1.3 / LTI Advantage. Score passback is included in the launch.
Build a simple react.js front-end that reads quiz questions from APIs provided by Flask. The front-end will load all questions up-front in our example.
The Flask backend of the final quiz tool will handle the following tasks:
LTI conversations with the platform (LMS), leveraging a set of decorators and functions.
Store and retrieve newly added quiz questions in a sqlite 3 database.
Provide a set of APIs for adding and retrieving quiz questions and answers.
The react.js front-end expects React 18 and in this initial exercise, we will be building react into static files in our development environment. While this is not generally the most efficient or best approach, we are building a small application where this is acceptable. For larger projects, alternate approaches using Webpack or a separate development nginx server would be useful.
I have also added Tailwind to this project, even though some vanilla CSS would probably do the trick. Why not!
Assumptions:
You have a working knowledge of Python 3 and React.js 18.
While I will do my best to walk through every line of code, even I do not have a full understanding of the libraries in use. Where I don’t have a ton of information, I will do my best provide links to sites with the most up-to-date stuff.
You are working on a Linux / MacOS – based system. Most of the commands are transferable if you are using GitBash on Windows… or a Linux subsystem.
Much of this code was inspired by Dmitry Viskov’s Flask Example repository. The code implements a fun breakout game written in plain JS that pushes a score and time back to the LMS. It also supports some deep linking for setting a difficulty. I may introduce deep linking at a later time (possibly for giving a teacher the ability to create new quiz questions) but that particular LTI service is not part of this tutorial.
Alright, let’s get started!
Make sure you are in an empty project folder, name of your choosing. Here are the commands you’ll want to use for getting your environment set up:
Add the dependencies to your project. Create a requirements.txt file in your project directory and add the following text. We won’t be using all of these in the first couple of parts but will eventually need them:
In the same directory, load up the required dependencies
pip install -r requirements.txt
In your project directory, create an app.py by using the ‘touch’ command or creating the file directly in your code editor. My preferred is VSCode. Place the following code at the top of the new app.py file:
import os, pprint, datetime
from tempfile import mkdtemp

# from questions import questions
# from dbmethods import drop_db_table, create_db_table, get_questions, get_question_by_id, insert_quiz_question, update_question, delete_question

from flask import Flask, request, jsonify, render_template, url_for
from flask_cors import CORS
from flask_caching import Cache

from werkzeug.exceptions import Forbidden
from werkzeug.utils import redirect
from pylti1p3.contrib.flask import FlaskOIDCLogin, FlaskMessageLaunch, FlaskRequest, FlaskCacheDataStorage
from pylti1p3.deep_link_resource import DeepLinkResource
from pylti1p3.grade import Grade
from pylti1p3.lineitem import LineItem
from pylti1p3.tool_config import ToolConfJsonFile
from pylti1p3.registration import Registration

class ReverseProxied:
    def __init__(self, app):
        self.app = app

    def __call__(self, environ, start_response):
        scheme = environ.get('HTTP_X_FORWARDED_PROTO')
        if scheme:
            environ['wsgi.url_scheme'] = scheme
        return self.app(environ, start_response)

app = Flask(__name__,
            static_url_path='',
            static_folder='./frontend/static',
            template_folder='./frontend/templates')

CORS(app, resources={r"/*": {"origins": "*"}})

app.wsgi_app = ReverseProxied(app.wsgi_app)

config = {
    "DEBUG": True,
    "ENV": "development",
    "CACHE_TYPE": "simple",
    "CACHE_DEFAULT_TIMEOUT": 600,
    "SECRET_KEY": "3dj90jdwi0d320edj9d",
    "SESSION_TYPE": "filesystem",
    "SESSION_FILE_DIR": mkdtemp(),
    "SESSION_COOKIE_NAME": "pylti1p3-flask-app-sessionid",
    "SESSION_COOKIE_HTTPONLY": True,
    "SESSION_COOKIE_SECURE": False,   # should be True in case of HTTPS usage (production)
    "SESSION_COOKIE_SAMESITE": None,  # should be 'None' in case of HTTPS usage (production)
    "DEBUG_TB_INTERCEPT_REDIRECTS": False
}
app.config.from_mapping(config)
cache = Cache(app)
Line 1 – importing some common Python modules. pprint is mostly used for debug.
Line 2 – tempfile is used for a temporary storage location. Specifically, a call to mkdtemp will be used to define a session file location. More info.
Lines 4-5 – commenting these out for now. We’ll build these custom dependencies / modules out later.
Line 7 – Import common Flask libraries for working with APIs and rendering pages.
Line 8 – CORS support for working with external domains / separate ports. This may not be necessary for our current approach, since we’re only running a single server in development, with React builds… but I like to make sure all bases are covered for all scenarios.
Line 9 – import the caching libraries needed for our backend. This will get configured later when our app is initialized.
Lines 11-12 – WSGI utilities for handling exceptions and redirects.
Lines 20-28 – A class that’s designed as a safeguard against URL munging when a web client is serving up static files (JS / CSS), when Flask generates HTML content.
Lines 30-33 – Create an instance of the imported Flask class.
Line 35 – CORS is used here for specifying origins that are allowed to access our future API endpoints.
Line 37 – Applying our reverse proxy from Line 20 to our wsgi application.
Ines 39 – 54 – Configure Flask for session and cache handling. You’ll need to generate your own “SECRET_KEY”. I just mashed some keys on this one. In production, this is used to keep client/server sessions secure. Feel free to paste in the output from something like this — run it in the REPL:
>>> import os
>>> os.urandom(24)
Now, let’s define some Python functions in app.py, used to further configure our LTI application:
lines 59-60: A method for accessing the Flask cache.
lines 62-68: A method that can be used for serving up the public jwks key for our tool.
At the bottom of your app.py, add the following lines of code (with some additional debug comments in case they are needed for future troubleshooting):
if __name__ == "__main__":
    #app.debug = True
    #app.run(debug=True)
    app.run()
IMS Global / 1EdTech – An excellent organization that continues to put forth great standards and frameworks for EdTech integrations.
LTI = Learning Tools Interoperability: A set of standards and services, primarily used for the proper integration of platforms (Learning Management Systems) and third-party tool providers, typically servicing Higher Ed and K12.
The search for up-to-date tool provider examples written in Python
In attempting to learn more about how I could leverage Python Flask or Django in developing a new LTI tool provider, I discovered some excellent (and up-to-date, as of this post) examples that I could use to build something locally for testing, and that I’m able to run fairly easily. This search wasn’t super-easy since there isn’t a lot that takes into account the newer standards with LTI 1.3 / Advantage, and isn’t dated like MITs pyLTI with support only for LTI 1.1 and/or 2.0 standards.
Dall-E generated: “oil painting of three dimensional bridge connecting two computers with a night sky background”
Finding a platform for testing an LTI
With the newer GitHub example project, I was able to build a local development environment, start up a Flask server, and serve up a simple tool that could be tested. BUT, I need a platform to do the proper testing! Launching endpoints will just error out until I have the context in place, within a course, in an LMS… or at least a simulated version of an LMS. That’s where saLTIre came in handy for this purpose. Let’s a take a look at how to properly set up this Flask example by making some changes to the tool provider’s configuration in order to get it to work properly with saLTIre platform emulator.
Setting up the Flask app for use with saLTIre
Step 1 – Set up your development environment and clone the repo
If you know how to deploy a Docker container to your desktop, that’s probably the easier method, outlined here: https://github.com/dmitry-viskov/pylti1.3-flask-example. I personally prefer getting things set up locally in a Python virtual environment, so that’s the option I used.
$ cd ~/dev
$ git clone git@github.com:dmitry-viskov/pylti1.3-flask-example.git
$ python -m venv ~/dev/python_envs/flask_lti13
$ source ~/dev/python_envs/flask_lti13/Scripts/activate
$ cd ~/dev/plylti1.3-flask-example
$ pip install -r requirements.txt
$ cd game
$ python app.py
The above is copied from the bottom of the GitHub repo’s README for this project, with a couple of minor changes for my personal environment. I’m using Git-Bash for Windows for this one and I like to store all my Python virtual environments in one directory, embedded in my development environment. I already have a dev directory in my home directory that contains all my various tests and projects.
Really, it’s up to you!
Please refer to Real Python’s primer for doing this properly in your choice of virtual environment.
Running python app.py will run the server… and if there are no errors to address, go ahead and shut it down before completing the next steps (Ctrl+C).
Step 2 – Add a new configuration that works with saLTIre
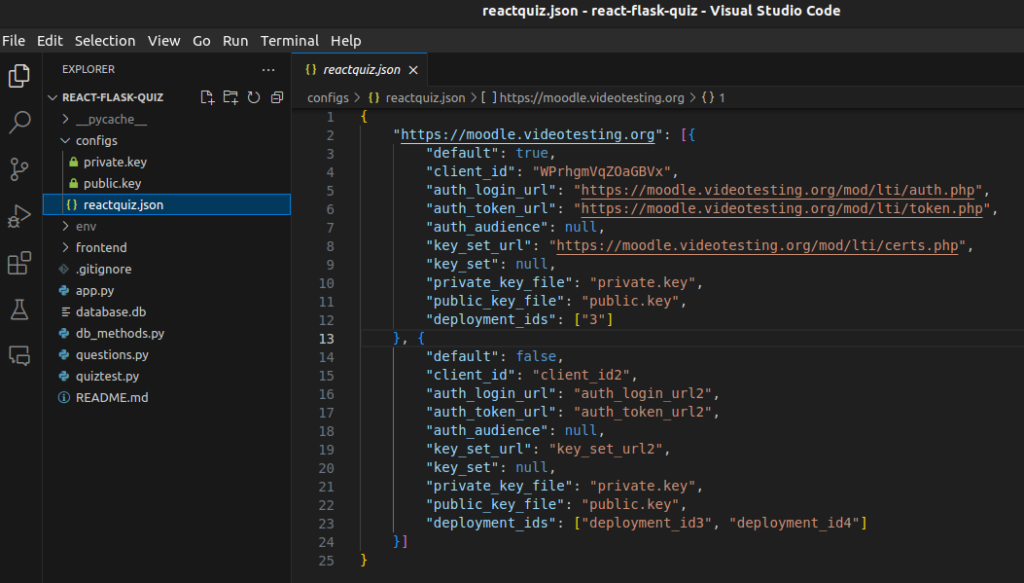
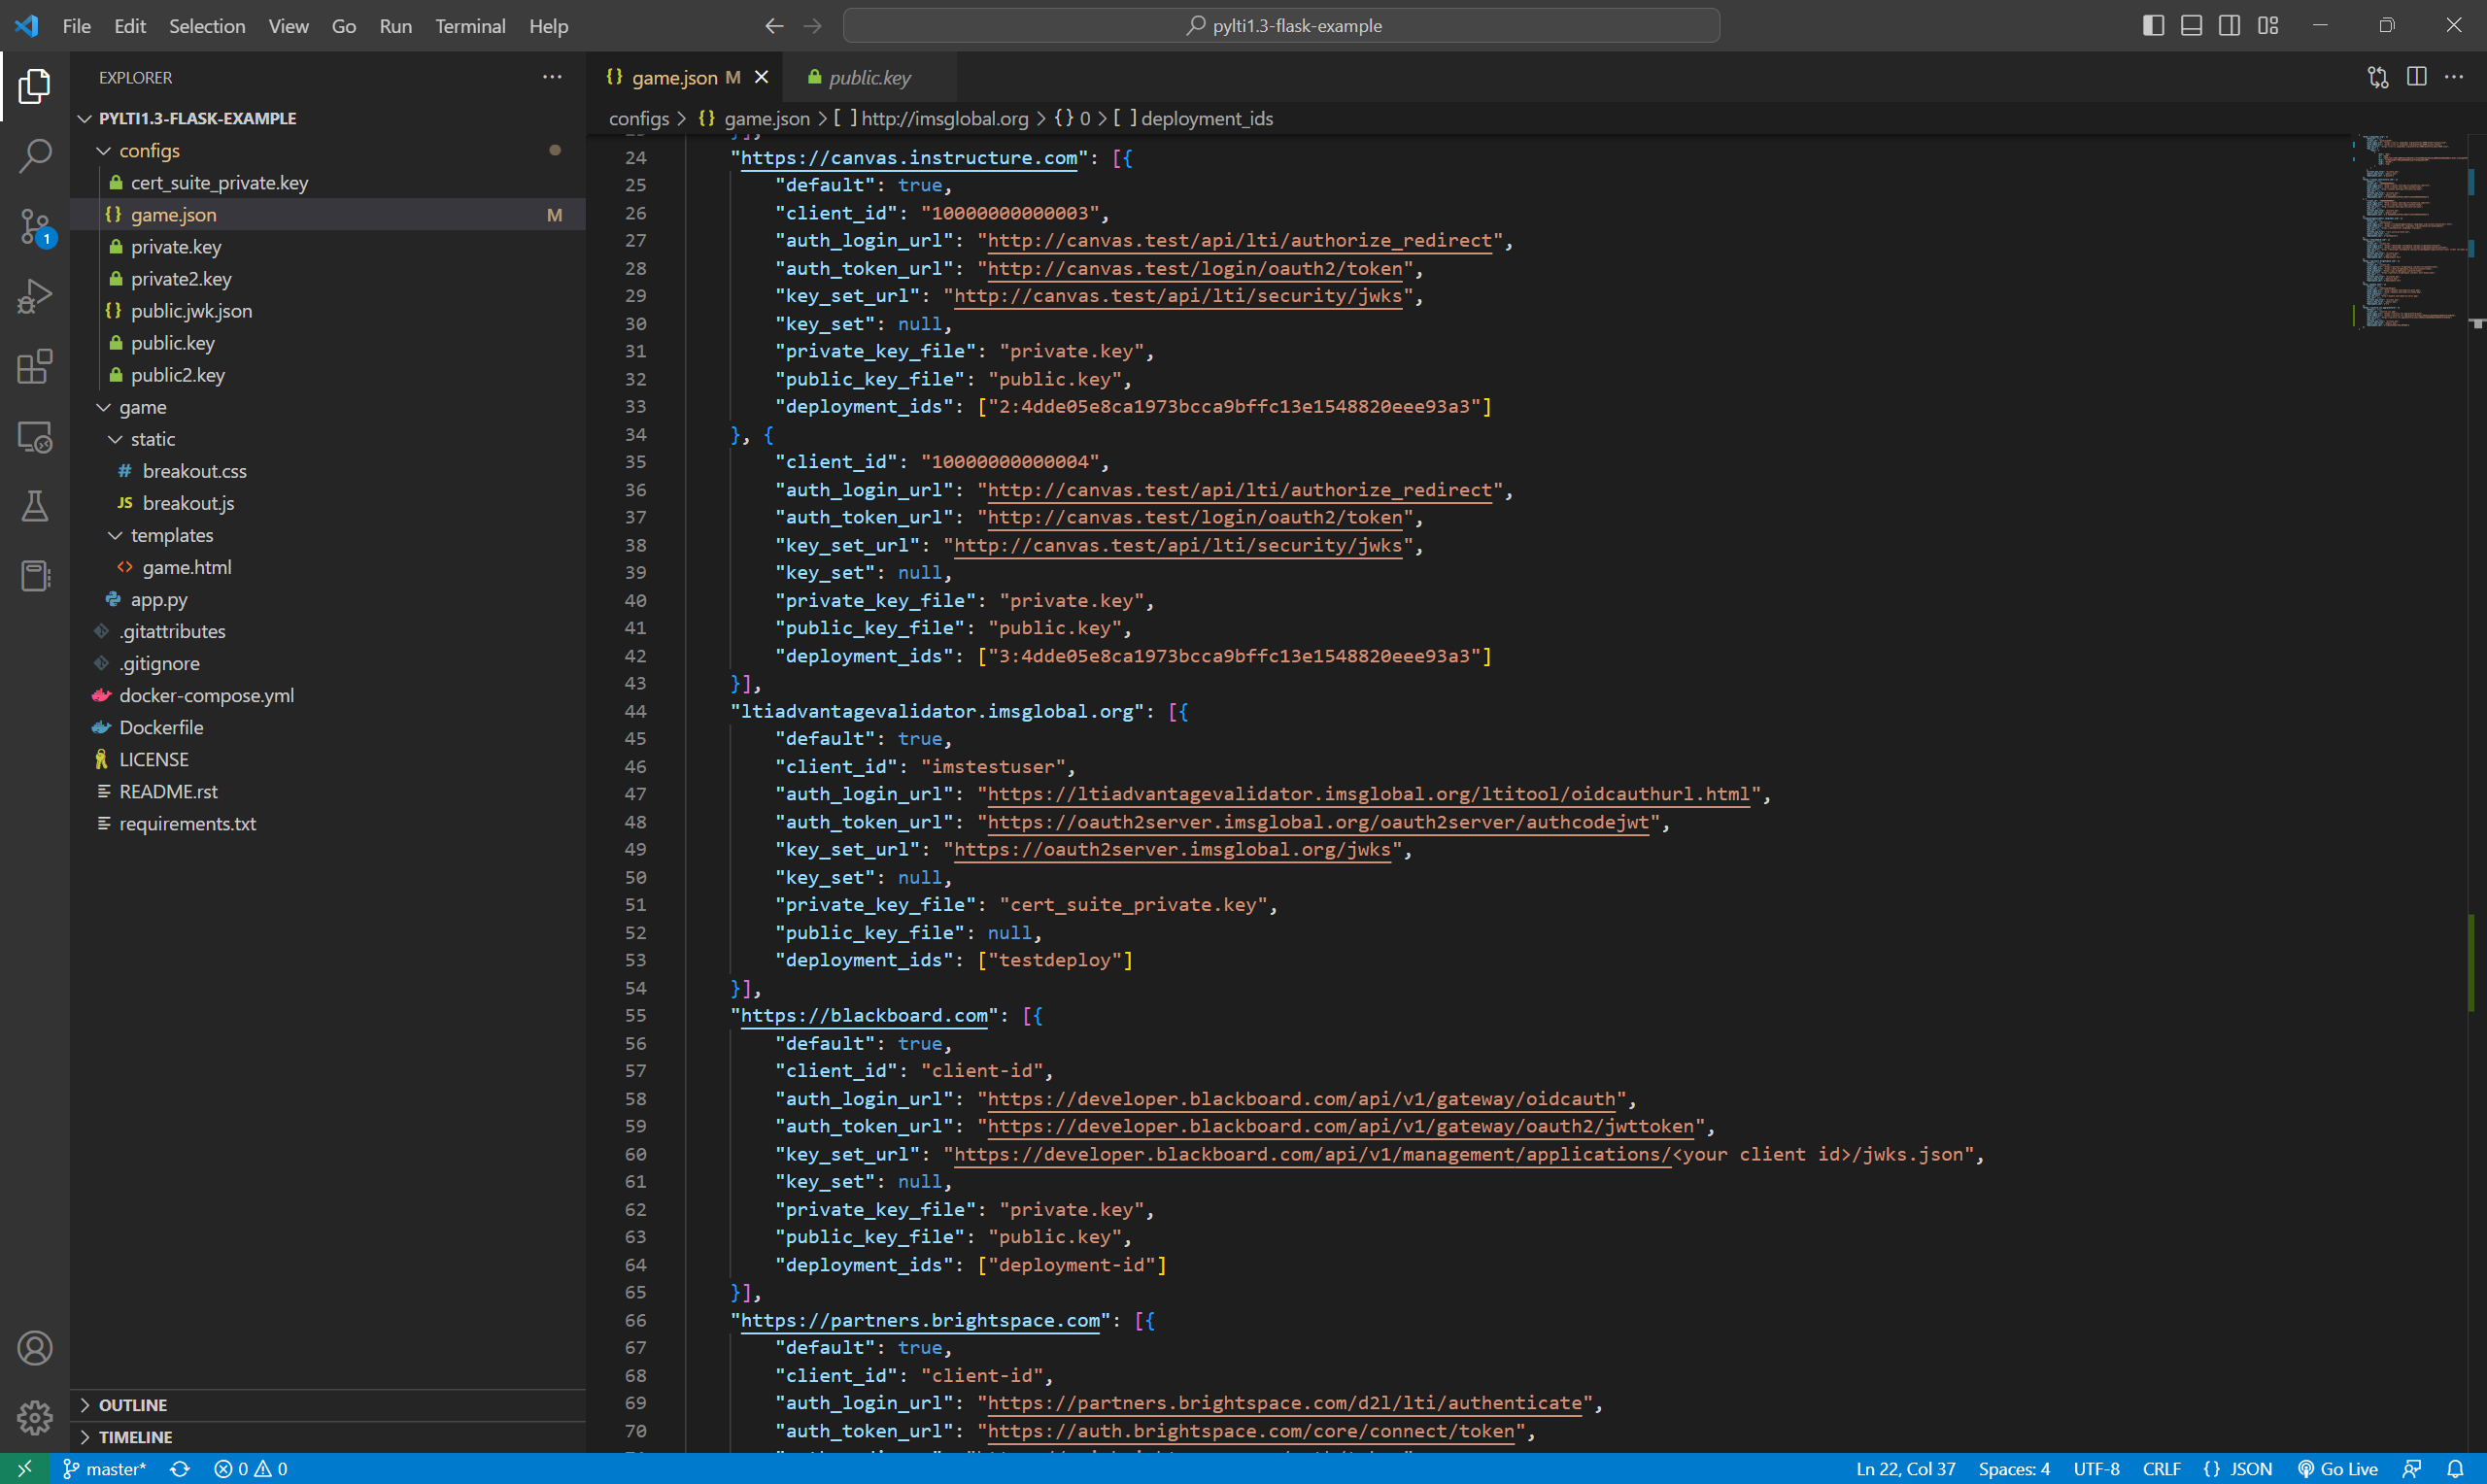
One thing you’ll notice with this project is that it includes several configurations in /configs/game.json for major Learning Management Systems like Canvas, Blackboard, Moodle, and D2L. It also includes additional client configurations for 1EdTech’s platform emulator / reference implementation and validator.
Since there wasn’t one for saLTIre, I added the following to the bottom of the file. It looks something like this:
Where did I get most of these parameters from? I’ll show you in the next step. We’ll get them from the saLTIre platform emulator. Go ahead and save the new platform config to the game.json file. You can adjust anything you need in here once the next steps are complete.
Setting Up saLTIre
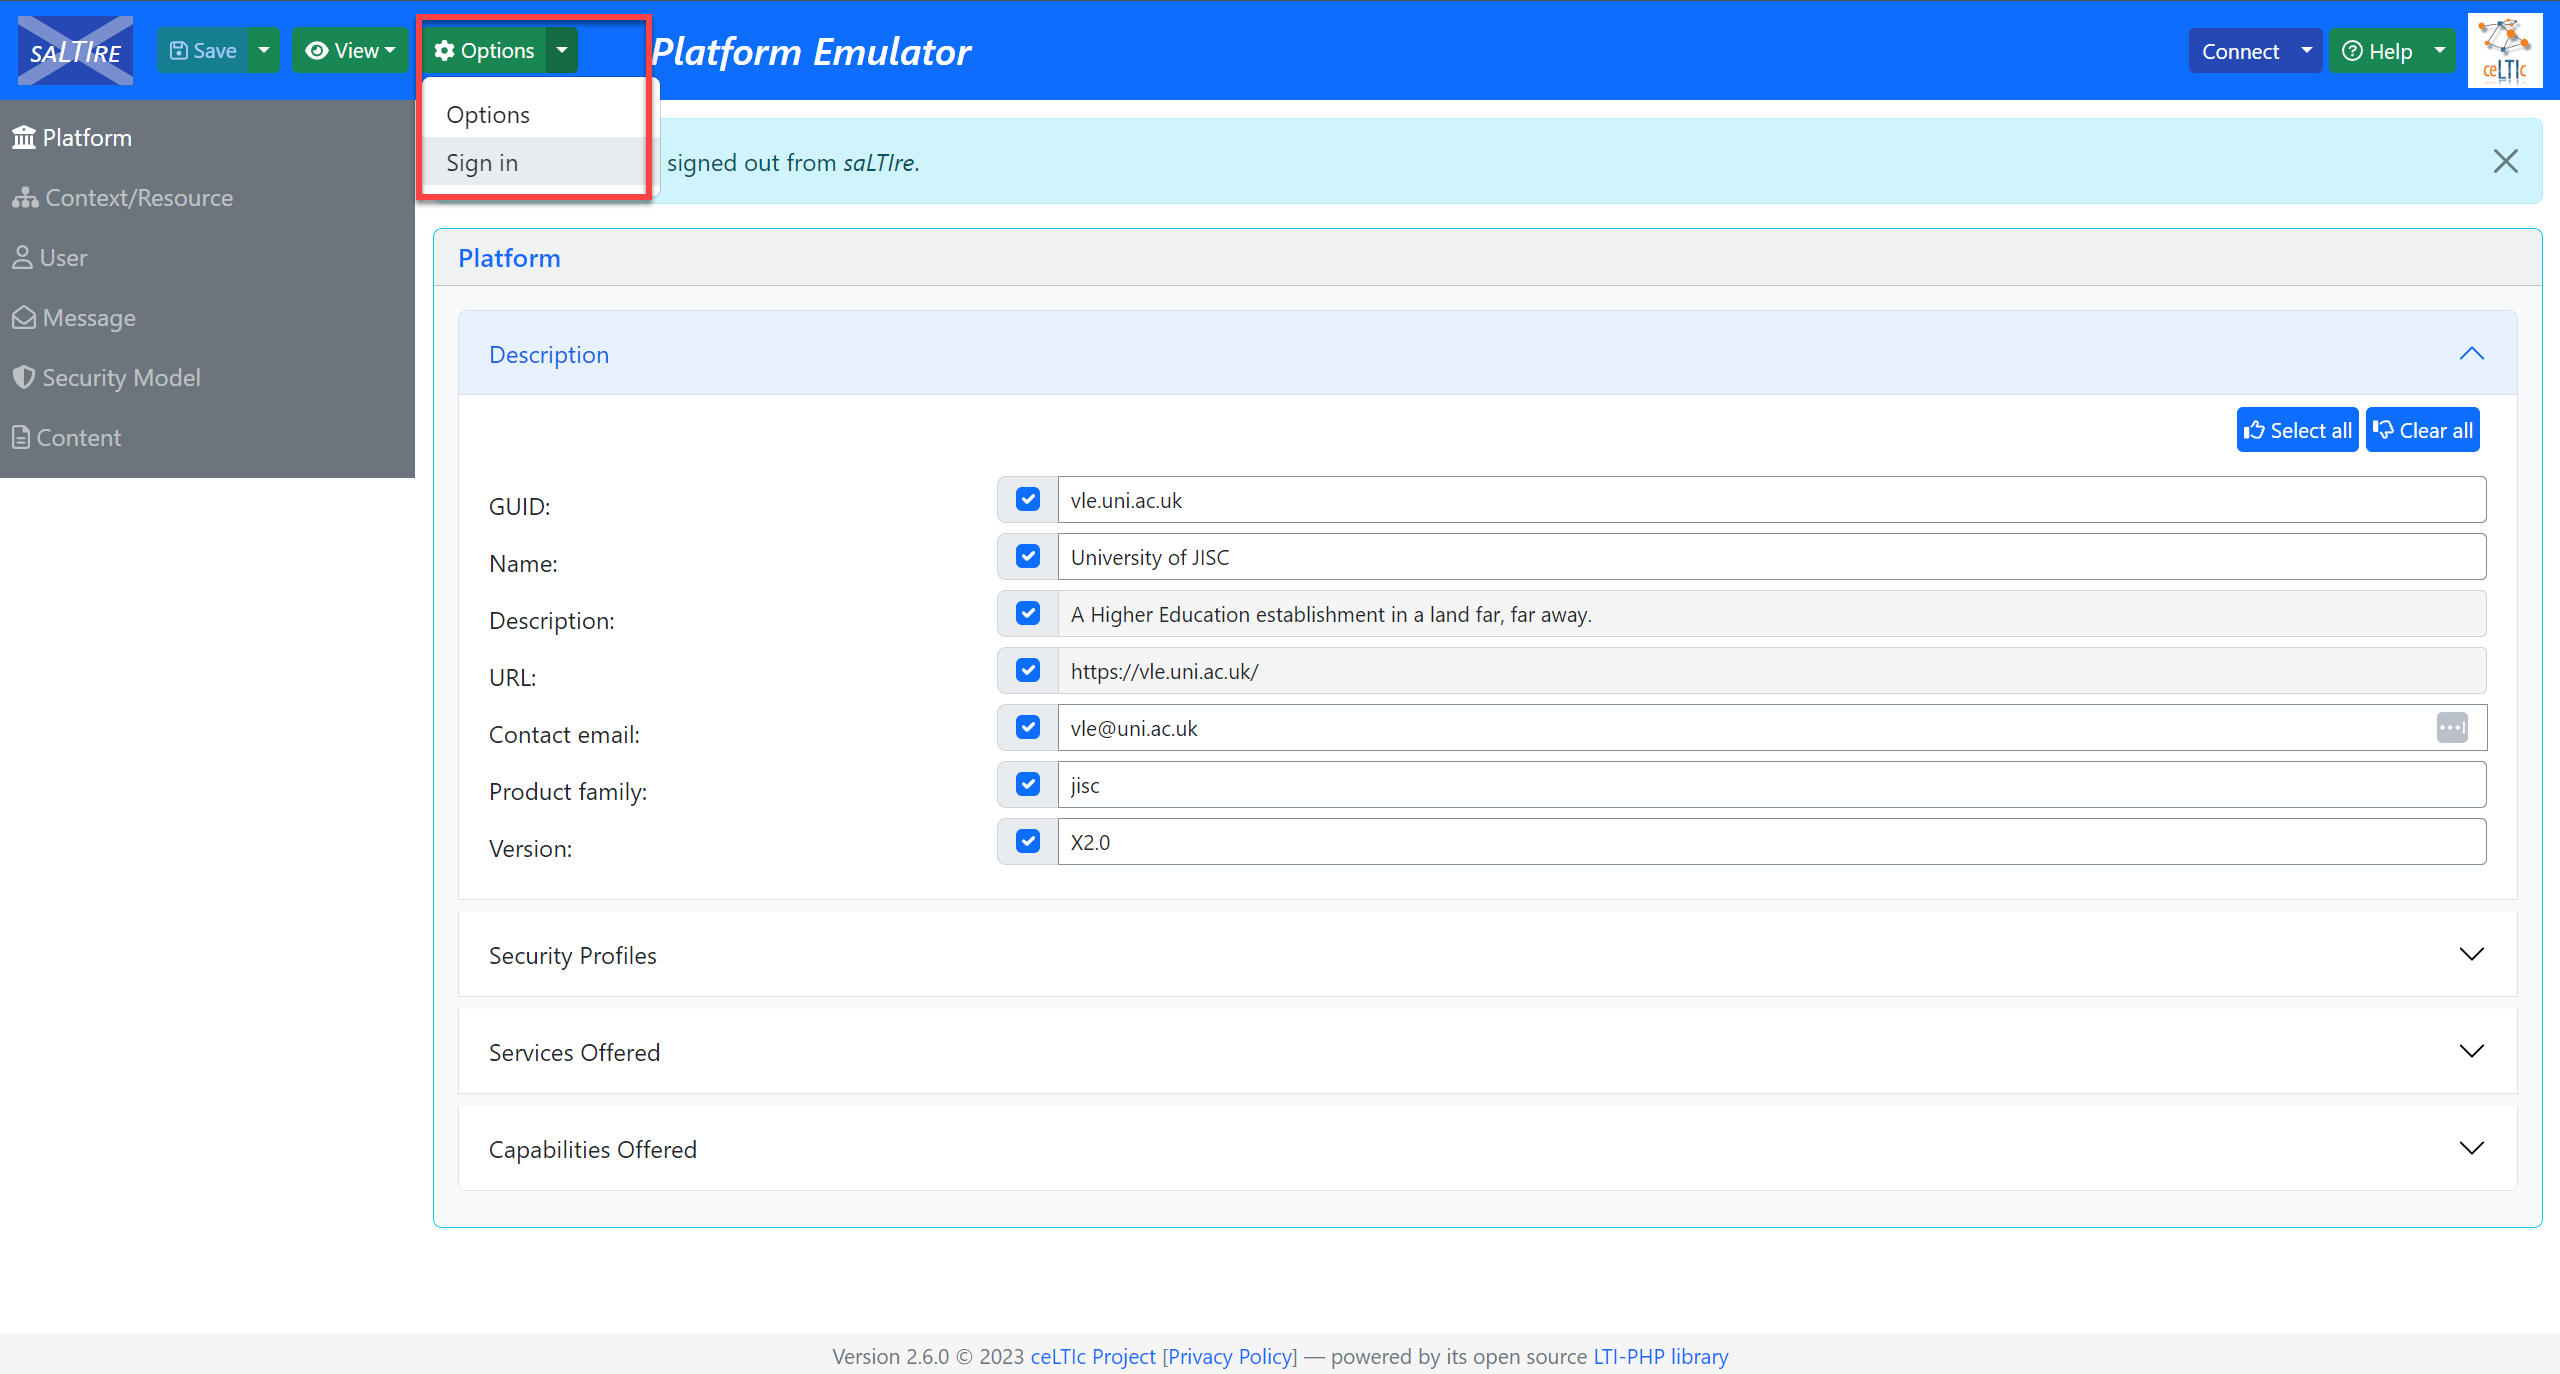
Step 1 – Create an account
Go to https://saltire.lti.app/platform and create an account. This may not be necessary but it allows you to save some of your tool-level configurations for subsequent use. You must have a Google account in order to sign in.
Click the Options dropdown -> Sign in
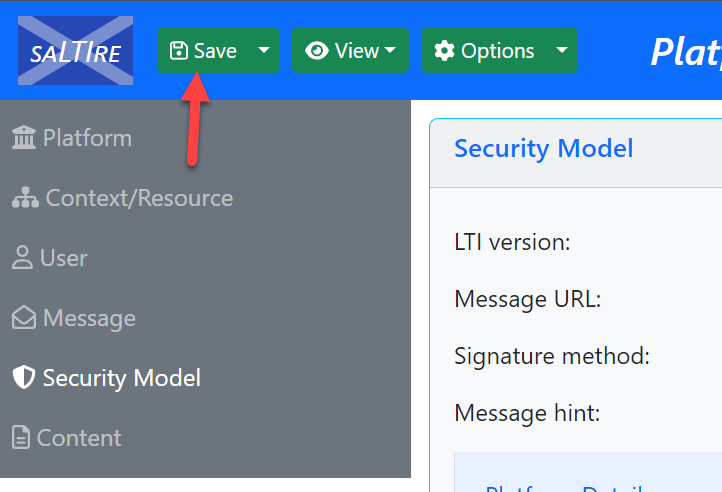
Step 2 – Configure the Security Model
Select Security Model and configure the following:
LTI version -> 1.3
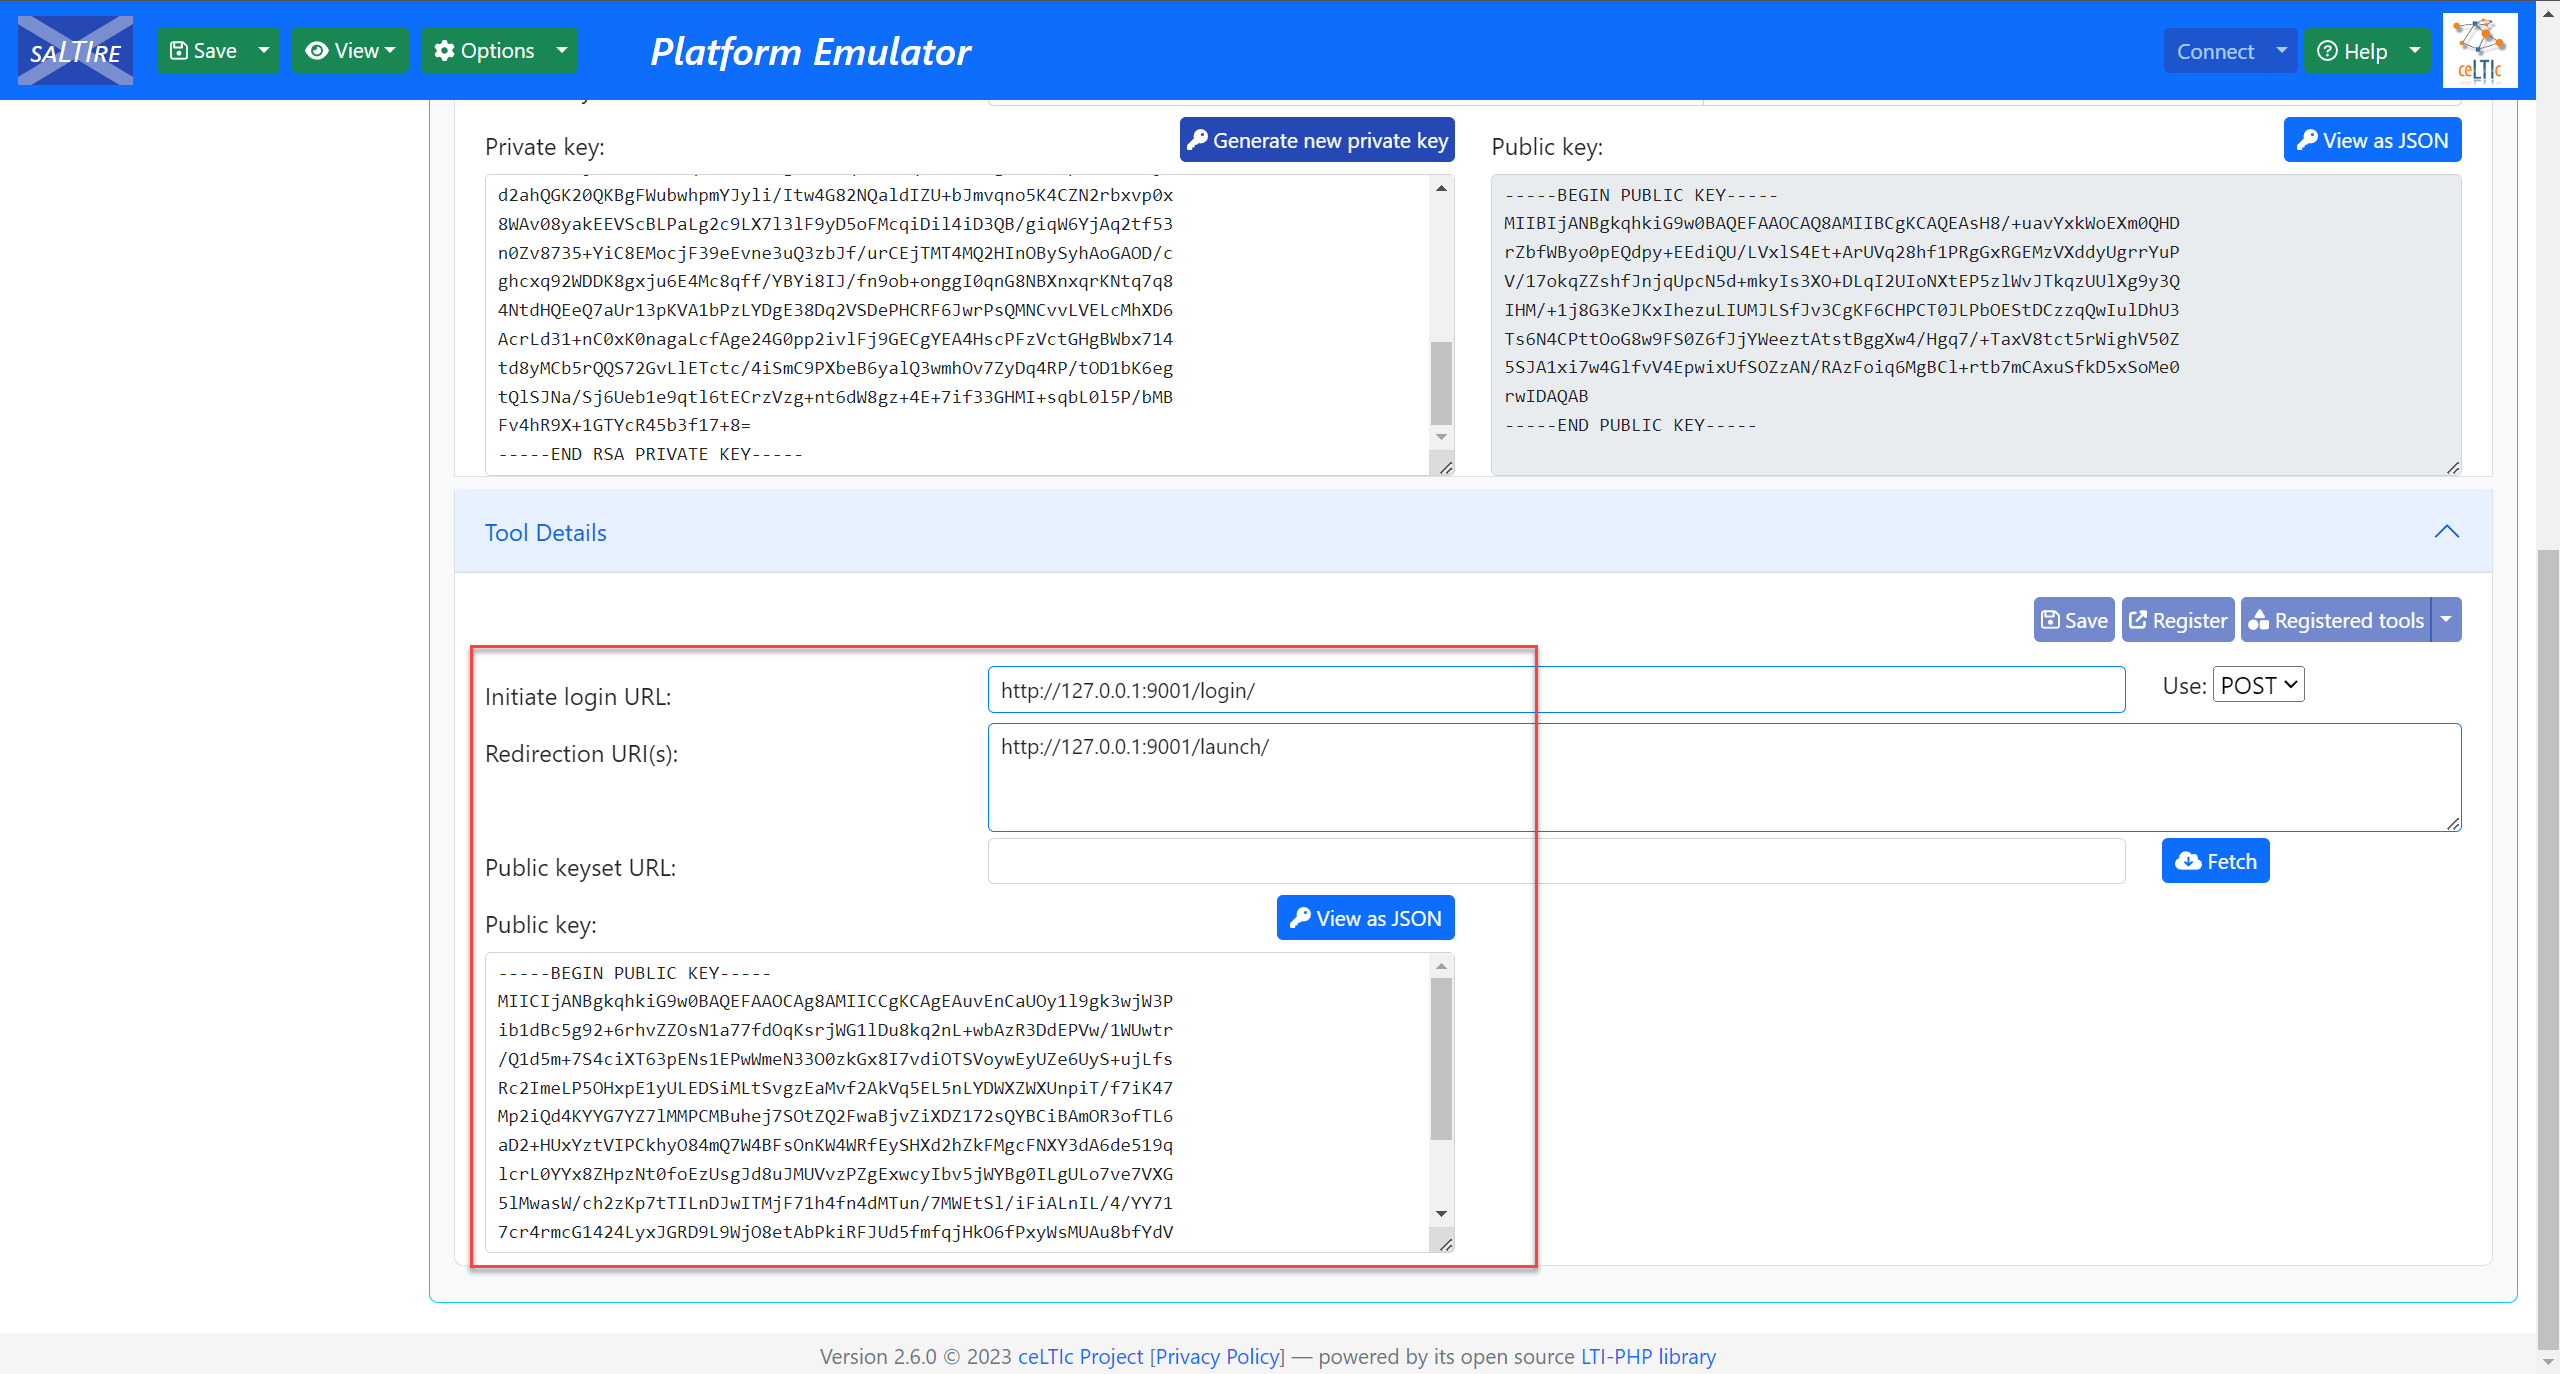
Message URL -> http://127.0.0.1:9001/launch/
Use the tool’s launch URL for this. If you followed the Flask app setup above (along with the github readme, you should be working with localhost and TCP port 9001.
Ensure that the signature method is set to -> RS256 (JWT Authorization).
Public key -> This (full text) needs to be copied from the key included with your Flask tool implementation. You can grab that from here (assuming your paths are like mine): ~/dev/plylti1.3-flask-example/configs/public.key. Essentially, the public key that you’ll want is inside your projects root directory -> configs, where we also found the game.json file.
After this is complete, you can register the tool, make it public and save your config. This is purely up to you but is great for future reference.
Click Save at the top of the screen, next to the saLTIre logo.
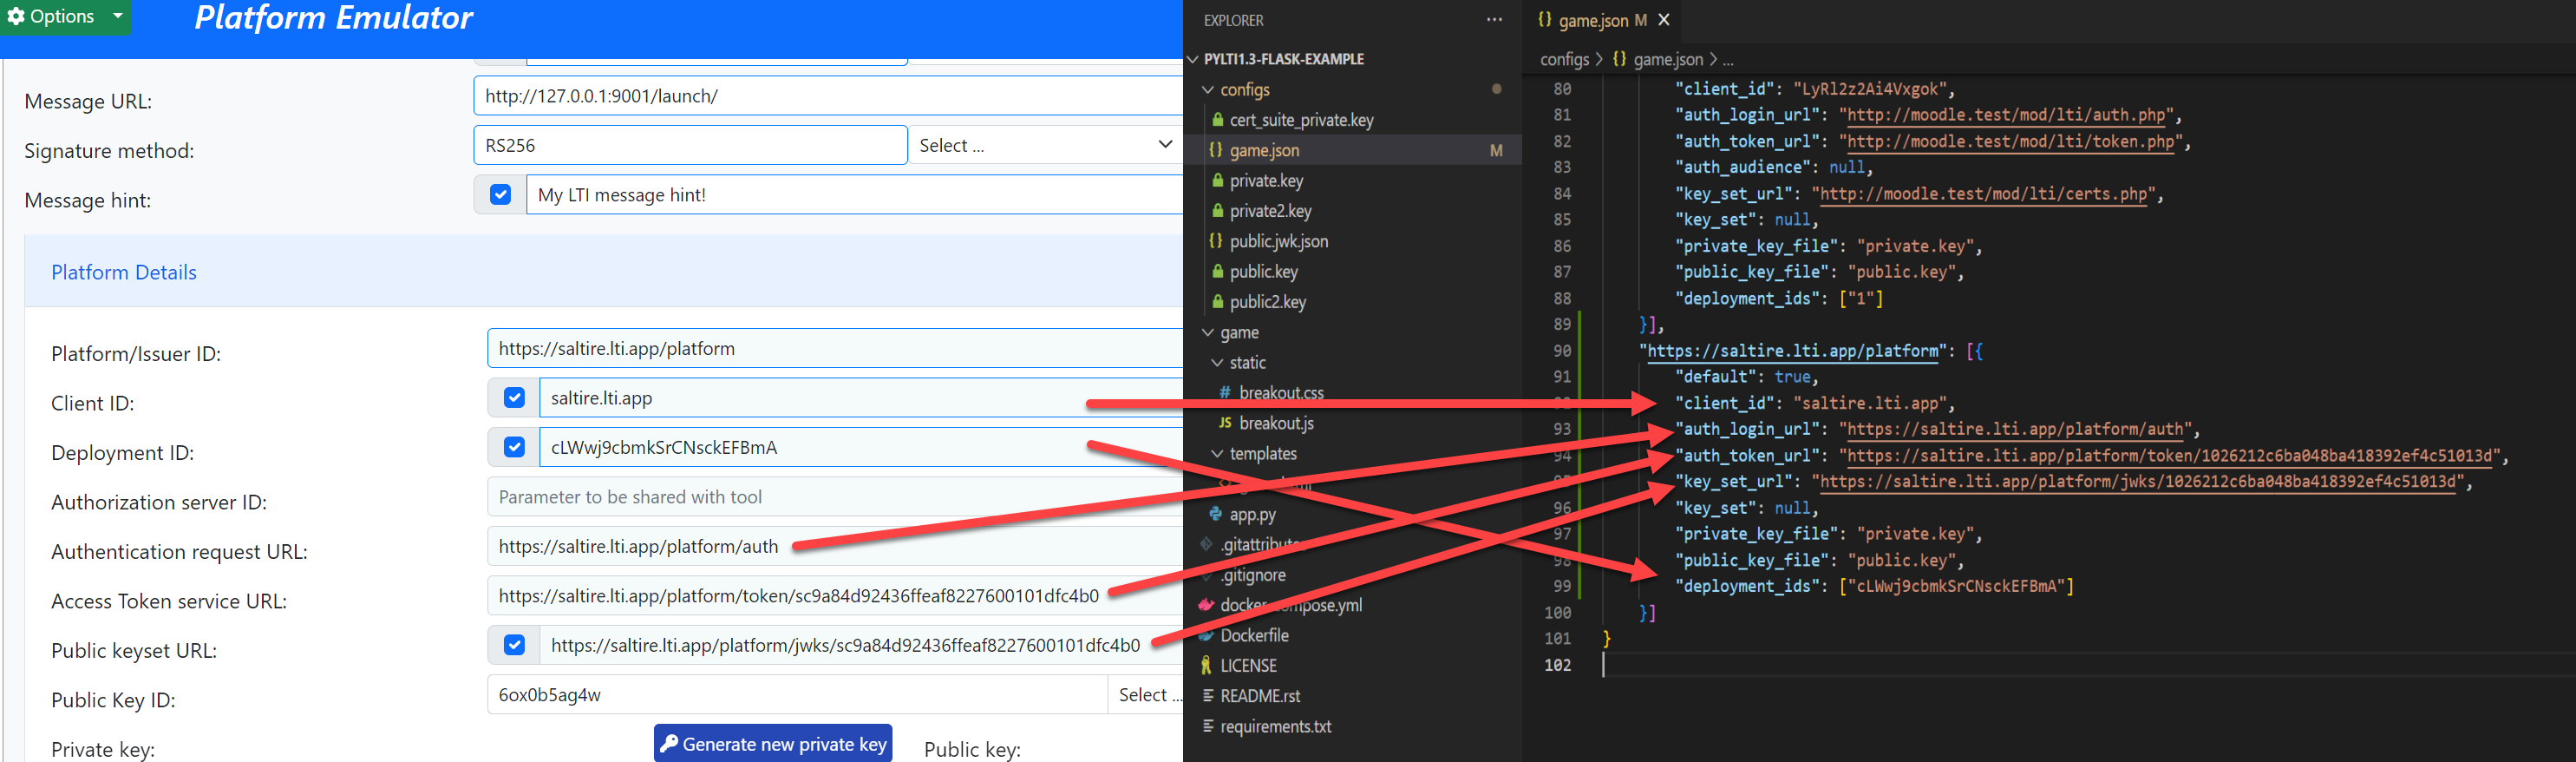
Step 4 – Confirm/configure platform details in the tool configuration
Yes, you are still on the Security Model page…
You’ll want to ensure that the /config/game.json contains the following platform details for the saltire platform configuration.
Client ID -> client_id
Deployment ID -> deployment_ids
Application Request URL -> auth_login_url
Access Token service URL -> auth_token_url
Public keyset URL -> key_set_url
Save the changes to the game.json file.
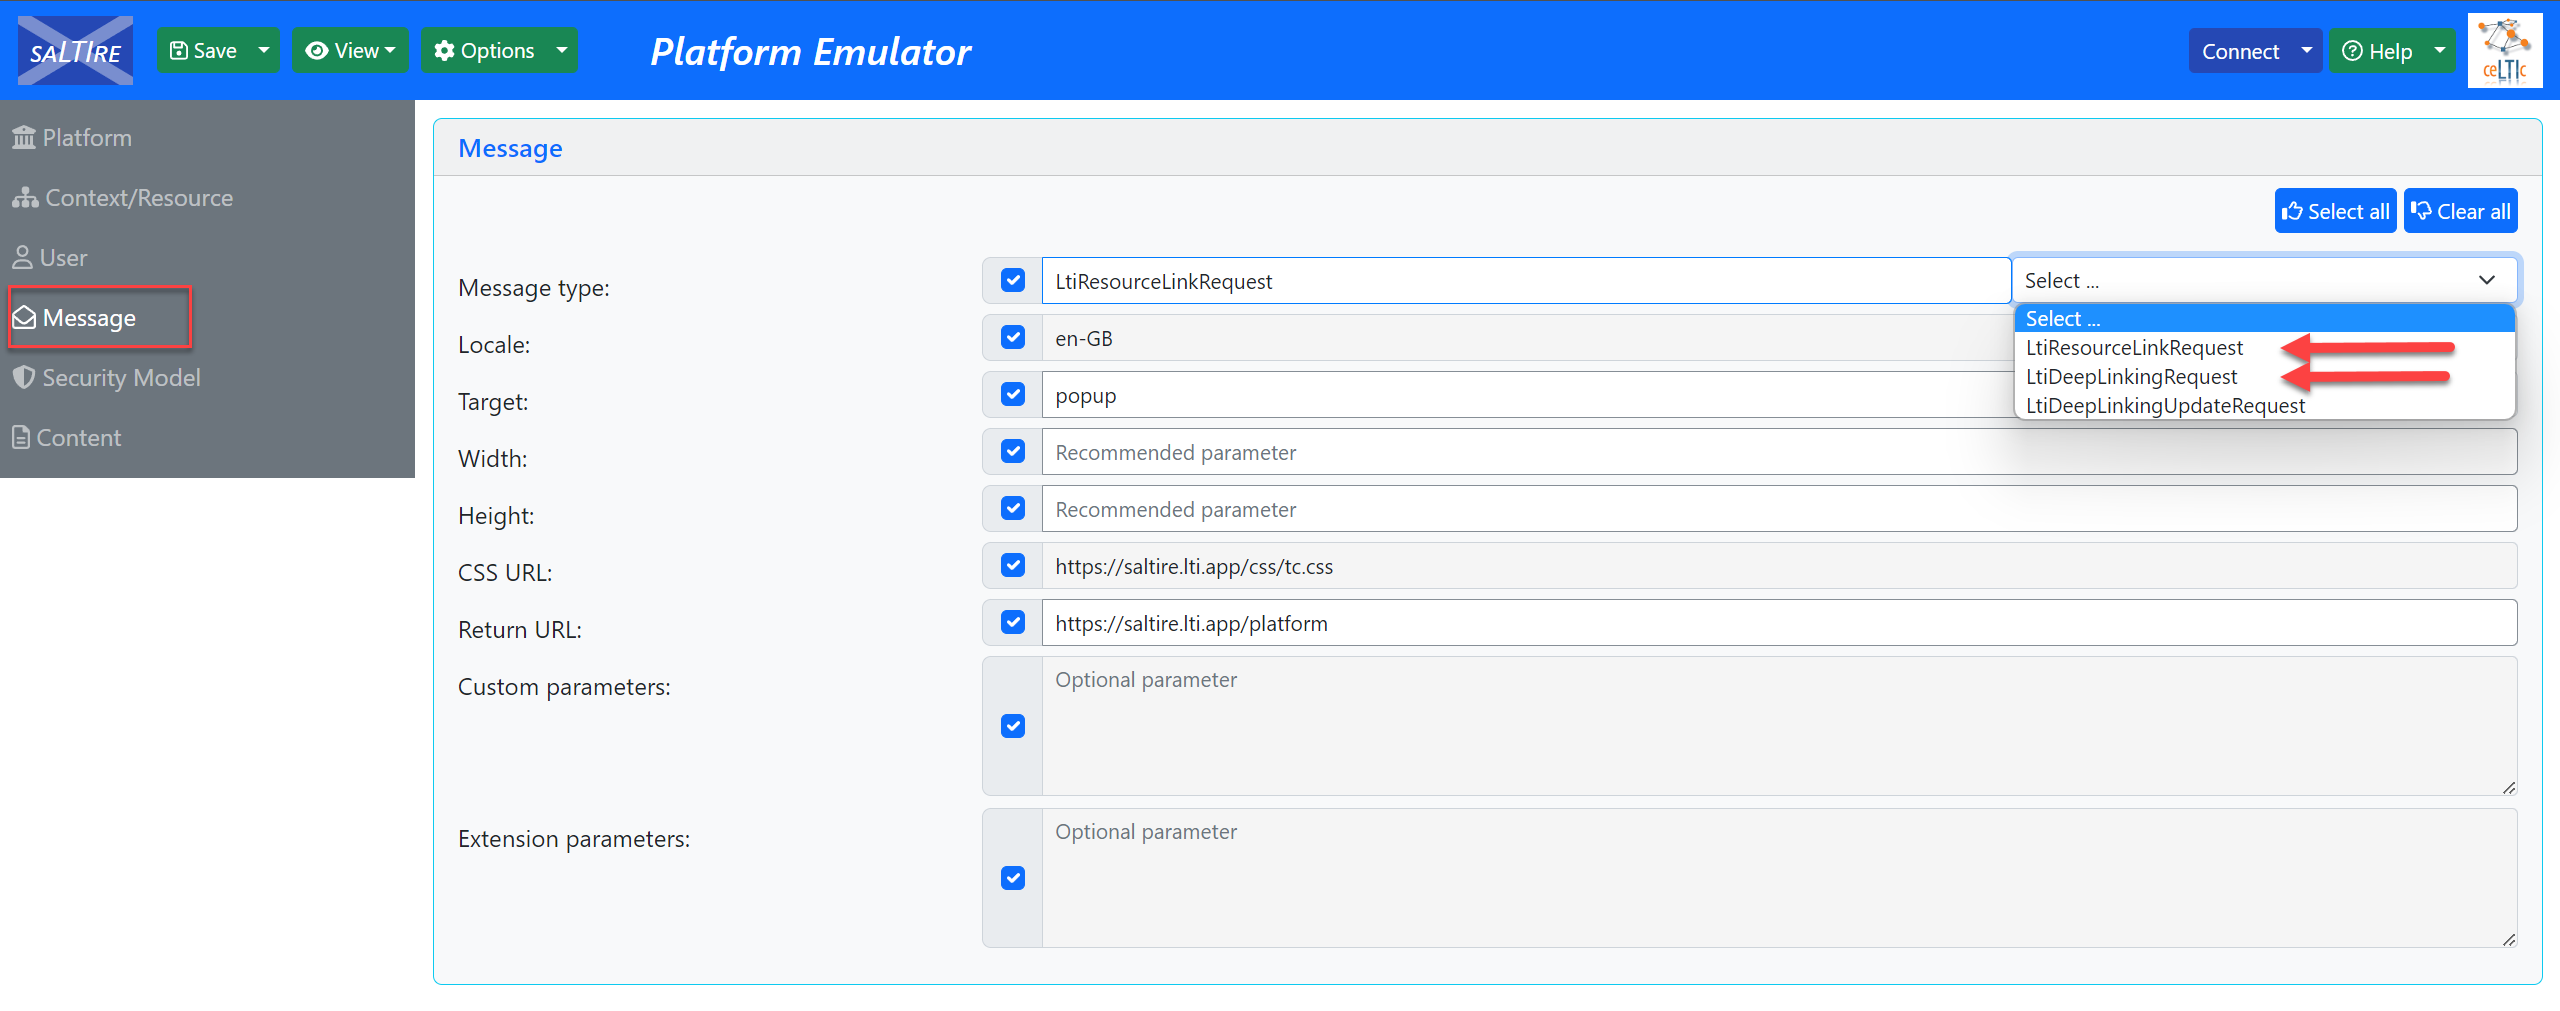
Step 5 – Configure the Message Type in saLTIre
Select the Message from the left navigation. At this point you will have different results based on the type of app you are using. With the game that we’re trying to launch, either deep linking or resource link requests will work, but each with different results. You will want to use the Deep Linking request in order to complete a full test and get back a response.
In this example, I’m selecting LtiDeepLinkingRequest
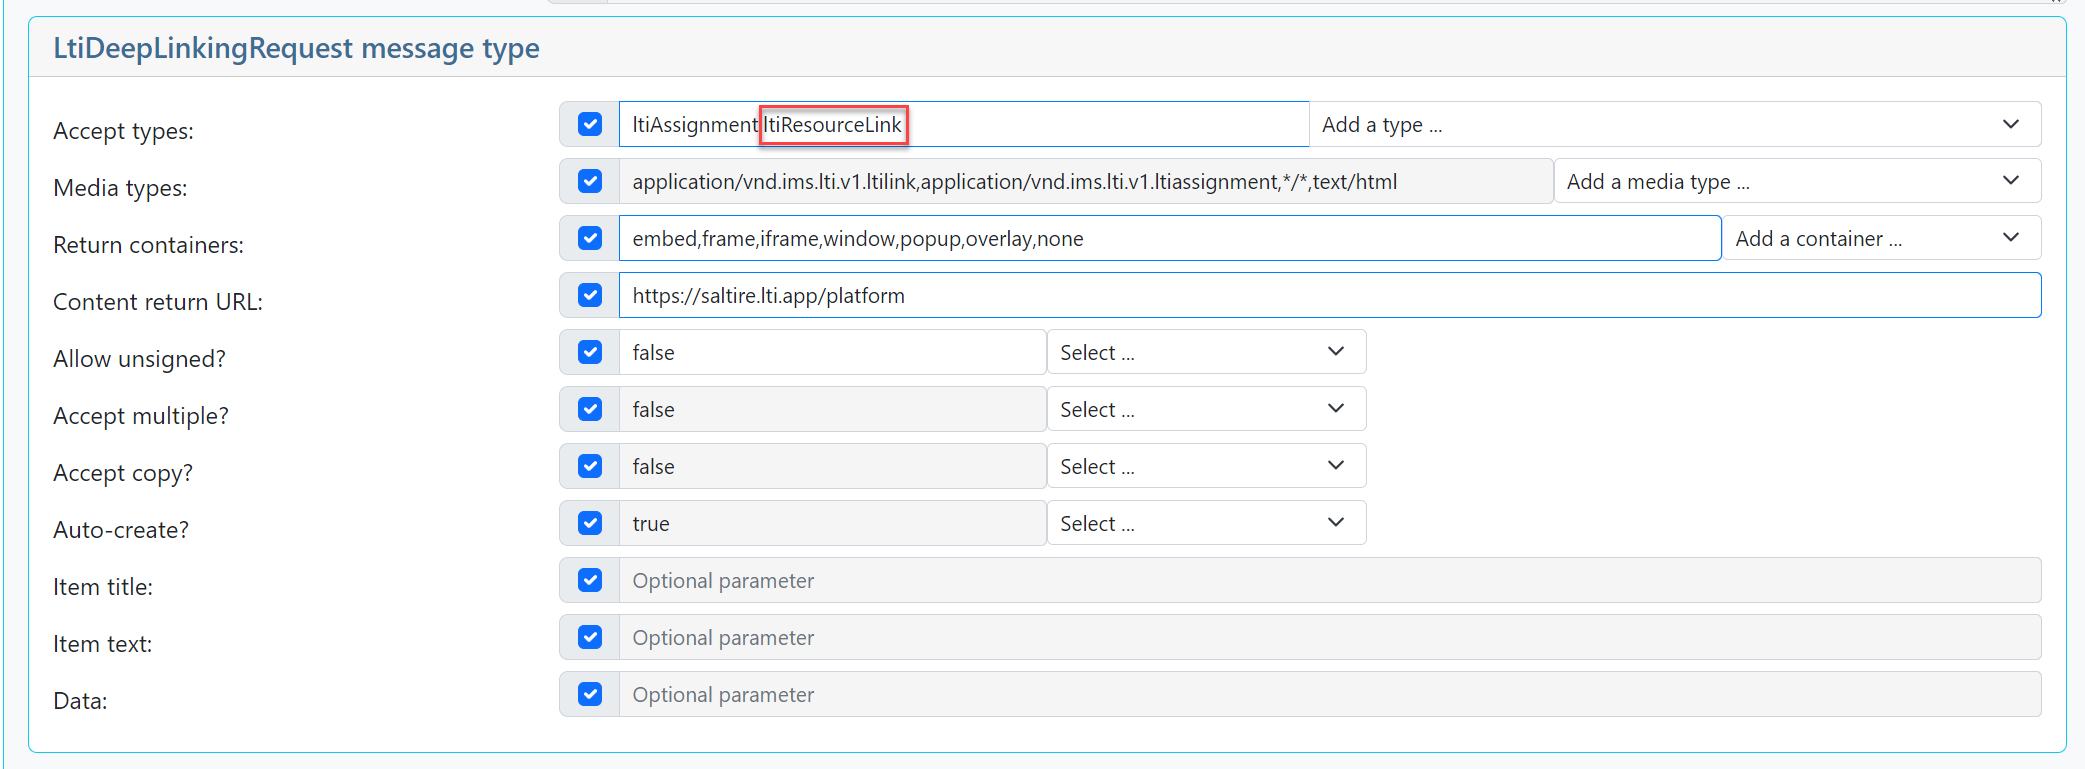
Once Deep Linking is selected, you’ll be presented with more options. Feel free to play around with this once things are up and running to gauge what the various results will be based on certain selections.
Beyond the defaults, at least LtiResourceLink needs to be added to the list of accepted types.
Don’t forget to click SAVE at the top of the page.
Launch the App locally and connect!
Launch the app.py in your <app root>/game directory. Don’t forget to enable the virtual environment. Should look something like this (I’m using git-bash on Windows):
source ~/dev/python_envs/flask_lti13/Scripts/activate
cd ~/dev/flask_projects/pylti1.3-flask-example/game
python app.py
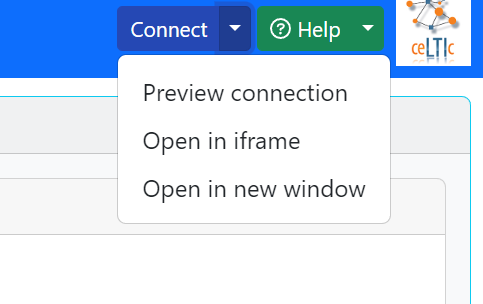
If all is well and without errors, try launching into the LTI tool from the platform by clicking on Connect at the top right corner of the screen. You can also select some options from the Connect drop-down for various launch conditions. One excellent way to debug the connection payload is to use the Preview connection option — one of my favorite items.
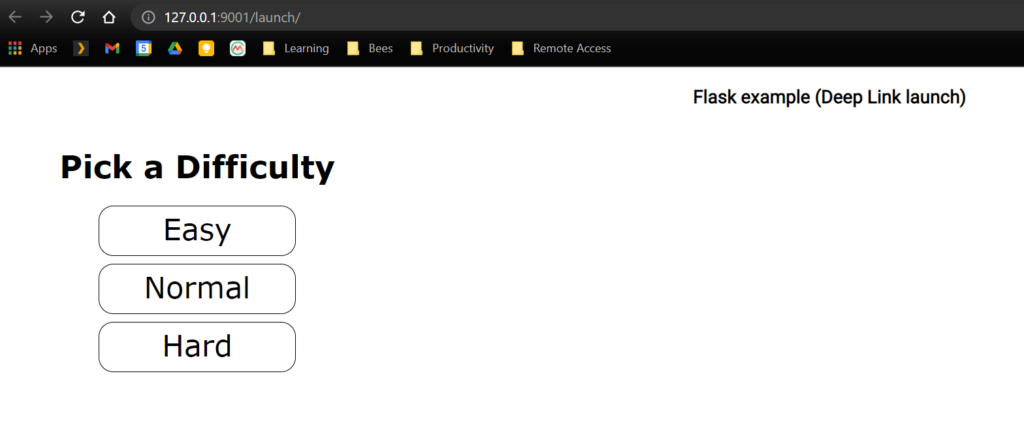
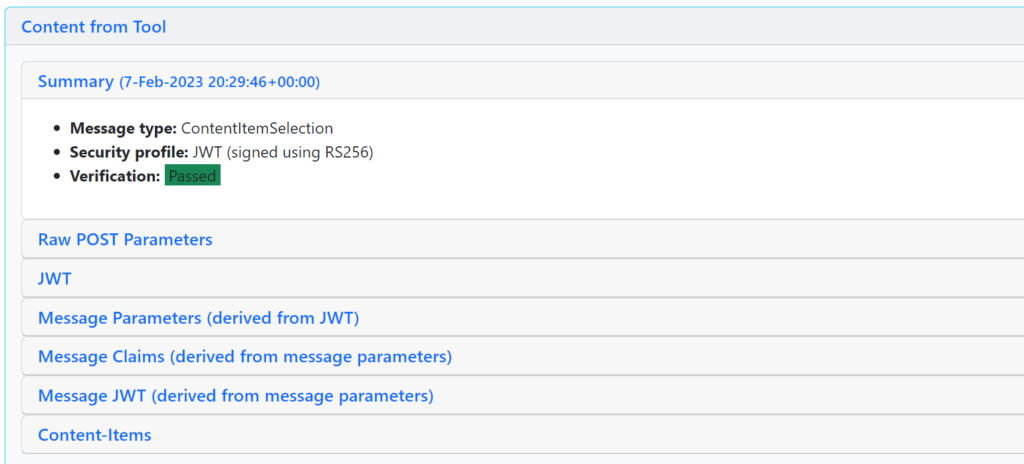
Once Launched the tool should present a difficulty selection…
… and with the deep linking option in saLTIre, you won’t get an opportunity to play the game but you’ll return to the platform with a whole lot of info and a verification status. You should see a green Passed if all went well.
You are able to play the game if you change the message type from LtiDeepLinkingRequest to LtiResourceLinkRequest. You can also see the name of the student in the game.
A score is likely being passed back… but that’s where I wasn’t able to make it ALL happen inside of saLTIre. I can certainly get us to an end, but would love to see this workflow work properly.
Launch and Authenticate -> Select Difficulty -> Play game to completion and close -> Score is passed back to the “gradebook” and a column created.
I’m hoping it’s just something I missed in the config but would be happy to hear what you think and if anyone out there can help me craft a solution. This is a great example of a working app inside of an LMS platform with score pass-back as a potential option.
Thanks! I’m looking forward to your feedback. Follow-ups and upcoming posts will include:
An explanation of what all this is and an exploration of authentication in LTI 1.3.
More closely checking out the tool inside the 1EdTech platform emulator. I attempted this option prior to using saLTIre and was disappointed in the results and received several errors. Perhaps saLTIre is just forgiving? Not sure.
Building an LTI app using Python and potentially exploring lowcode / nocode tools for implementing an LTI. What are the security challenges(?), etc.